Blog Patrol

Sunday, 30 September 2007

Flashback : no3 "Overlord Ancient Ruin Texture - Part 1"

The images below are the property and copyright of both Triumph Studios and Codemasters


Will be going about this differently to what I did with the flashback on the Gears texture. For this one I will explain the layers I used to build up what finally becomes the following final texture.

Layer 1 - Colour Base
I used Painter for the first time during Overlord. The blend tools are more organic and natural then those of Photoshops which works well for the al
most 'cartoony' textures required for this game and other games such as World of Warcraft etc. This layer is JUST colours. This is the initial design stage of the texture.


This method is quite different to how I usually texture. In this one we have highlights and shadows in the very first layer. Usually a big 'no no' with photorealistic texturing but here we can get away with it since realism isn't the main priority. This first layer really is the 'skeleton' of the texture, any major mistakes on this layer and the rest will come crumbling down.


Layer 2 - First photo overlay.


Added moss photo overlays to th
e moss on the colourbase


Layer 3+4 - stains and drips

Just took some simple soft brushes and threw down some details, smudged and erased a bit.

From the image above you might be forgiven for thinking these extra details were fine tuned for hours and done with great care but if you look closer it really is rough! Remember, these details for now at least are just 'designs'. Build them up generally, not drip by drip so to speak. Don't spend ages on one stain only to realize the composition of all the stains at the end look out of place.

Tuesday, 25 September 2007

Education : no16 'AO / Lightmap'

1. Throw in skylight, plop.
2. Press '9', turn on light tracer.
3. Select Low poly and press zero key for the render to texture dialogue
4. 'Pick' High poly object
5. Make sure your low and high poly 'fit' each other well. If not then enable projection cage, reset and scrub the 'push' so that you push the cage slightly past the low poly.
6. 'Add' lighting map, setup your filename and location etc
7. Hit render

You will get a map similar to the one below. Blend it into your texture psd. (see what blend mode works best for you)

Its vital to do this with all texture passes nowadays, if not your stuff will look dated. Unless you spend ages painting all this detail in, correctly.


Wednesday, 19 September 2007

Random : no4 'Graphics challange'

Here are some images from popular games of the past. It's interesting how people instantly know the answers from such little detail. I put this in a forum and within the night they had all the correct answers so it isn't impossible. What really blew my
mind was 'C' and how many instantly knew which game it is from even though there is very little detail at all.


Monday, 17 September 2007

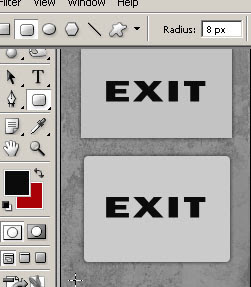
Education : no15 "Rectangle tool"

Top sign is your typical boring rectangle. Using the rectangle tool you can change the roundness of the edges by adjusting the radius option that sits at the top of the screen. Easy.


Sunday, 16 September 2007

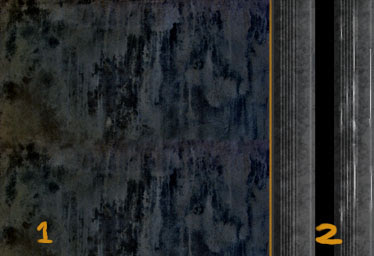
Education : no 14 'Extra detail in spec maps'

1) Don't just turn the diffuse into a spec map and be done with it. In many cases adding an extra spec grunge/dirt map like this within your spec map only can really create much more interesting and realistic textures.

2) On the left is a simple diffuse to spec conversion but even with the edges, add 'unique to spec only' brightness to it as seen on the right.

Friday, 14 September 2007

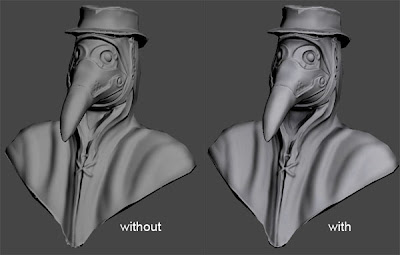
Random : no 3 'CGTalk UGAC switch/reversal Competition'

I'm currently having a stab at this challenge. Have to take an exsisting character/setting and change the style/setting/sex etc

I'm going with a modern day take on the 'plague doctor' figure from the 17th century.

I've been going over the design for quite some time and finally came to this design,


You can see how I got to this design and check out any progress by going to the following link,

http://forums.cgsociety.org/showthread.php?f=39&t=537843

Tuesday, 11 September 2007


Flashback : no2 'Gears of War texture part 4'

Final part then. Check it area number 4. Again that scratched away surface could be more defined but I won't bring up texture definition again. No the problem I have with this is how its just on ONE of multiple ridges. It all goes back to education no3 where I mentioned storytelling in texture work. If you think about it what I did in this texture meant that when this trunk was being moved about only that particular ridge was getting hit against surfaces. Which of course is just stupid beyond words. The truth is those ridges will be generally getting hit almost equally with there being slightly more damage to the ridges nearer to the corners. Anyway for my fix I only spent a minute but it still shows how if I were to do this again I would tone down the rubbed off/scratched/effected areas on the ridge and apply the same kind of detail to all ridges.