Some examples of texture work done for Unreal3 back in 2006.
Monday, 25 February 2008
Thursday, 7 February 2008
Education : no24 'Making maps/trims tile both 50% and 100%'
Often when building levels you need walls/trim etc meshes of various sizes. There could be a full wall and then half a wall as two seperate meshes for example. Now if you make a texture map that can tile it will work with the full wall but not the half wall.
1. Duplicate tiling wall/trim in your psd.
2. Offset 50% horizontal on your new layer
3. Softly erase both ends on this layer so the underlying layer and this layer transitions well.
4. Collapse this layer into the underlying layer to make one layer.
Now this will tile perfectly on both full walls and half walls. You can advance this method and have it so it will also work on quarter walls/trims if needed.
Often when building levels you need walls/trim etc meshes of various sizes. There could be a full wall and then half a wall as two seperate meshes for example. Now if you make a texture map that can tile it will work with the full wall but not the half wall.
1. Duplicate tiling wall/trim in your psd.
2. Offset 50% horizontal on your new layer
3. Softly erase both ends on this layer so the underlying layer and this layer transitions well.
4. Collapse this layer into the underlying layer to make one layer.
Now this will tile perfectly on both full walls and half walls. You can advance this method and have it so it will also work on quarter walls/trims if needed.
Sunday, 3 February 2008
Education : no23 'Hide selection in Photoshop'
Did you know pressing Ctrl and H while an area is selected it will hide the selection tool (as well as any guides). This can come in handy when setting the correct tone with levels or hue/saturation etc and the selection box/shape is in the way.
Thursday, 31 January 2008
Education : no22 'Piclens by cooliris'
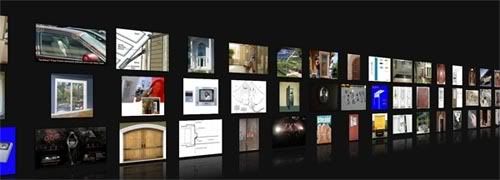
This is quite something. Free tool that you install into your firefox browser. Once installed and you visit google search you'll notice that when rolling over any image a blue arrow appears. Click on it and you will be instantly taken into this virtual dark room where you can easily navigate every image from your search. No loading and no page changes. Once you find a pic you can either printscreen or press a icon that thats you to the page with that image if you wish to 'save image as'.
You can also use this with other popular image sites such as flickr. Just try it because words just don't do it justice.
https://addons.mozilla.org/en-US/firefox/addon/5579
This is quite something. Free tool that you install into your firefox browser. Once installed and you visit google search you'll notice that when rolling over any image a blue arrow appears. Click on it and you will be instantly taken into this virtual dark room where you can easily navigate every image from your search. No loading and no page changes. Once you find a pic you can either printscreen or press a icon that thats you to the page with that image if you wish to 'save image as'.
You can also use this with other popular image sites such as flickr. Just try it because words just don't do it justice.
https://addons.mozilla.org/en-US/firefox/addon/5579
Wednesday, 30 January 2008
Education : no21 'Gradient Pass'
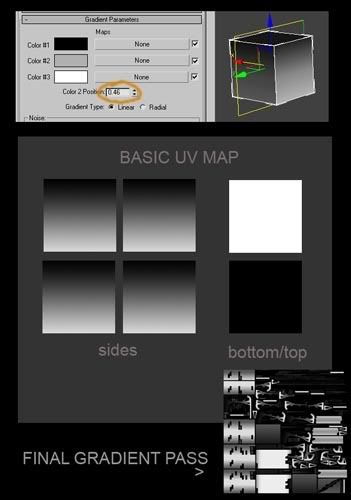
This is a useful trick for complicated environment meshes. I will use a box for this example to make it as straight forward as possible. First of all you need UV channel 1 to be mapped as usual and also need to have channel 2 unwrapped where no polygon is overlapping and has its own space (really cheap and nasty way to do it is to 'unpack uv's' in unwrap editor in Max). Add new material to your mesh (everything you want this effect on should be atatched as one mesh) Add a gradient map into the diffuse slot, feel free to play around with the settings to get the effect you want. Add a UV map, align it correctly and rotate the gizmo if needed in order to change the direction of the gradient. Now press zero key to bring up render to texture and render out a diffuse into map channel 2.
I have photoshopped the 'basic uv map' to show what you essentially get at the end. If its more complicated you'll get something like the example shown in bottom right. Now you can use this layer in Photoshop as a mask for dirt/grime/rust/moss. In max you can add noise by playing with the settings to make the gradient less perfect but you can also do that in Photoshop in various ways.
This is a useful trick for complicated environment meshes. I will use a box for this example to make it as straight forward as possible. First of all you need UV channel 1 to be mapped as usual and also need to have channel 2 unwrapped where no polygon is overlapping and has its own space (really cheap and nasty way to do it is to 'unpack uv's' in unwrap editor in Max). Add new material to your mesh (everything you want this effect on should be atatched as one mesh) Add a gradient map into the diffuse slot, feel free to play around with the settings to get the effect you want. Add a UV map, align it correctly and rotate the gizmo if needed in order to change the direction of the gradient. Now press zero key to bring up render to texture and render out a diffuse into map channel 2.
Sunday, 27 January 2008
Education : no20 'Turning an difficult photo into seamless texture'
Neil Blevins provides 2 methods on how to fix this common problem after offsetting as shown in the image below
http://www.neilblevins.com/cg_education/brightness_var_tileable_texture/brightness_var_tileable_texture.htm

Neil Blevins provides 2 methods on how to fix this common problem after offsetting as shown in the image below
http://www.neilblevins.com/cg_education/brightness_var_tileable_texture/brightness_var_tileable_texture.htm
Monday, 21 January 2008
Education : no19 'Layer Managment'
2 years in the industry and I still don't have a fool proof guide on how to set up layers. I wish there was an universal way of doing it so that we instantly know whats going on when opening other peoples psd's. Everyone has their own style when it comes to layers. I hope to do more on this in the future but for now some of my methods.
'General' Folder
Have a 'general' folder with layers for dirt, scratches, rust/edgework, shadowing etc that are generally painted over the whole map. Before I would have something like dirt_objectX, dirt_objectY etc thinking it gave me more control but often I'd end up with multiple different layers for multiple types of general layer. Try to limit to yourself to one layer per 'general texture'.
Colour scheme
Devise a colour system for the main groups. I use red for diffuse, blue for normals and green for specular. You can expand on this to create your own little helpers. For example I sometimes add to the layer names what they will later be copied into. For example General_highlights (spec) or General_indents (norm / spec). It really depends how complex the map is.
'Normals / setup' and 'Normals / final'
"Normals / setup" Group. The cheap way to do it is to throw various layers from diffuse on top of a gray background. Adjust the layers and then normal map filter it. I stick a 50% grey background layer on the bottom with the various layers from diffuse added on top BUT one by one I'll have just one of these layers showing along with the background and then edit the layer/background to produce a good normal and then throw that into a group called 'Normals / final'. At the end you then have multiple normal maps and can easily change the intensity of each layer by simply changing the opacity. Instead of going back and changing the original layer and filtering it again.
2 years in the industry and I still don't have a fool proof guide on how to set up layers. I wish there was an universal way of doing it so that we instantly know whats going on when opening other peoples psd's. Everyone has their own style when it comes to layers. I hope to do more on this in the future but for now some of my methods.
'General' Folder
Have a 'general' folder with layers for dirt, scratches, rust/edgework, shadowing etc that are generally painted over the whole map. Before I would have something like dirt_objectX, dirt_objectY etc thinking it gave me more control but often I'd end up with multiple different layers for multiple types of general layer. Try to limit to yourself to one layer per 'general texture'.
Colour scheme
Devise a colour system for the main groups. I use red for diffuse, blue for normals and green for specular. You can expand on this to create your own little helpers. For example I sometimes add to the layer names what they will later be copied into. For example General_highlights (spec) or General_indents (norm / spec). It really depends how complex the map is.
'Normals / setup' and 'Normals / final'
"Normals / setup" Group. The cheap way to do it is to throw various layers from diffuse on top of a gray background. Adjust the layers and then normal map filter it. I stick a 50% grey background layer on the bottom with the various layers from diffuse added on top BUT one by one I'll have just one of these layers showing along with the background and then edit the layer/background to produce a good normal and then throw that into a group called 'Normals / final'. At the end you then have multiple normal maps and can easily change the intensity of each layer by simply changing the opacity. Instead of going back and changing the original layer and filtering it again.
Subscribe to:
Posts (Atom)