
Education : no32 'sharpen'
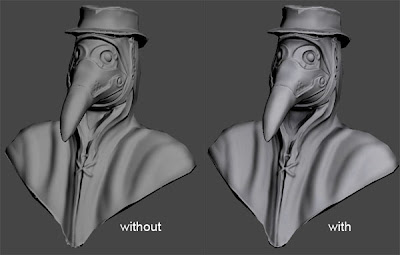
Someone mentioned to me that rotating a layer in a PSD will lose density but it's at such a low level that it's hard to notice. If you rotate quite a bit you do lose quality so as I've mentioned before always sharpen the final image. 'Smart sharpen' is the best tool to use for this since you have more control than the other methods.

Showing posts with label education. Show all posts
Showing posts with label education. Show all posts
Tuesday, 8 July 2008

Saturday, 28 June 2008
Education : no31 'Colour Map'
This is one of the more newer maps that texture artists use. I often come across people that have never heard of such a thing so I will just explain it's purpose as simply as possible. You should open up the following image while reading this.
1. So imagine this is say 3% of your asset. 5 plains that share the same UV's and texture. It tiles but it sort of looks bland.
2. On UV channel1 the UV's are 5 boxes overlaying each other but in another channel (usually 2 or 3) we have UV's for multiple parts. We make them so small so there is room to have a unique face for each plain. This is to be the colour map and is usually 1024 or 2048 pixels.
3. This is a zoomed in view of the top left corner of the UV map. The rest of the map will be filled with all the other parts of the asset, I'm just not showing them here.
4. Very crude but hopefully it puts the idea across which is that you can paint unique details onto each plain.
5. So now all 5 plains do not look exactly the same.
The whole process really is just an alternative decal method. I almost always have colour maps now for every medium or large asset.

This is one of the more newer maps that texture artists use. I often come across people that have never heard of such a thing so I will just explain it's purpose as simply as possible. You should open up the following image while reading this.
1. So imagine this is say 3% of your asset. 5 plains that share the same UV's and texture. It tiles but it sort of looks bland.
2. On UV channel1 the UV's are 5 boxes overlaying each other but in another channel (usually 2 or 3) we have UV's for multiple parts. We make them so small so there is room to have a unique face for each plain. This is to be the colour map and is usually 1024 or 2048 pixels.
3. This is a zoomed in view of the top left corner of the UV map. The rest of the map will be filled with all the other parts of the asset, I'm just not showing them here.
4. Very crude but hopefully it puts the idea across which is that you can paint unique details onto each plain.
5. So now all 5 plains do not look exactly the same.
The whole process really is just an alternative decal method. I almost always have colour maps now for every medium or large asset.

Thursday, 19 June 2008
Education : no30 'Quick saving the diffuse'
When saving the diffuse for preview in the 3D app you usually 'save as' and select the image type etc but on those time consuming textures you can save time by going to actions in photoshop where you can 'record' an action so you just hit 1 button to save. Sometimes it can be off putting as it will suddenly stop working because it has changed the name of your diffuse (usually by adding 'copy' in the filename). If this does happen simply keep it and just temporarily change the root of the texture in the 3D app so it points to this 'copy'.
When saving the diffuse for preview in the 3D app you usually 'save as' and select the image type etc but on those time consuming textures you can save time by going to actions in photoshop where you can 'record' an action so you just hit 1 button to save. Sometimes it can be off putting as it will suddenly stop working because it has changed the name of your diffuse (usually by adding 'copy' in the filename). If this does happen simply keep it and just temporarily change the root of the texture in the 3D app so it points to this 'copy'.
Sunday, 25 May 2008
Education : no29 'Concrete Edgework'
Quick example here. On the left I've done edgework that almost contains the same tones and size. Edgework in generally should never be this perfect unless it's something very hard and new. On the right is an better example of how to go about doing it where there are shifts in tone and size on an edge that is clearly more broken/old looking.

Quick example here. On the left I've done edgework that almost contains the same tones and size. Edgework in generally should never be this perfect unless it's something very hard and new. On the right is an better example of how to go about doing it where there are shifts in tone and size on an edge that is clearly more broken/old looking.

Sunday, 3 February 2008
Thursday, 31 January 2008
Education : no22 'Piclens by cooliris'
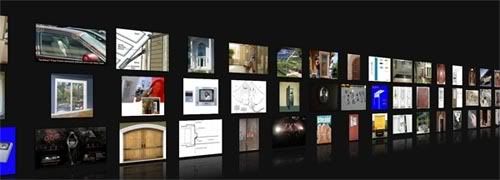
This is quite something. Free tool that you install into your firefox browser. Once installed and you visit google search you'll notice that when rolling over any image a blue arrow appears. Click on it and you will be instantly taken into this virtual dark room where you can easily navigate every image from your search. No loading and no page changes. Once you find a pic you can either printscreen or press a icon that thats you to the page with that image if you wish to 'save image as'.
You can also use this with other popular image sites such as flickr. Just try it because words just don't do it justice.
https://addons.mozilla.org/en-US/firefox/addon/5579

This is quite something. Free tool that you install into your firefox browser. Once installed and you visit google search you'll notice that when rolling over any image a blue arrow appears. Click on it and you will be instantly taken into this virtual dark room where you can easily navigate every image from your search. No loading and no page changes. Once you find a pic you can either printscreen or press a icon that thats you to the page with that image if you wish to 'save image as'.
You can also use this with other popular image sites such as flickr. Just try it because words just don't do it justice.
https://addons.mozilla.org/en-US/firefox/addon/5579
Wednesday, 30 January 2008
Education : no21 'Gradient Pass'
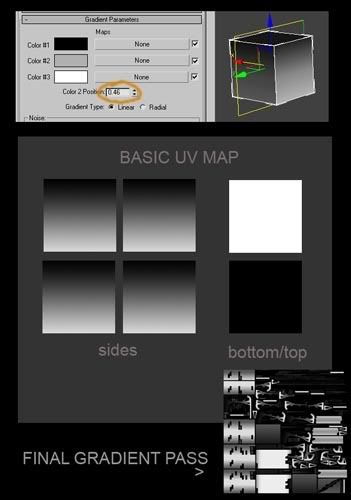
This is a useful trick for complicated environment meshes. I will use a box for this example to make it as straight forward as possible. First of all you need UV channel 1 to be mapped as usual and also need to have channel 2 unwrapped where no polygon is overlapping and has its own space (really cheap and nasty way to do it is to 'unpack uv's' in unwrap editor in Max). Add new material to your mesh (everything you want this effect on should be atatched as one mesh) Add a gradient map into the diffuse slot, feel free to play around with the settings to get the effect you want. Add a UV map, align it correctly and rotate the gizmo if needed in order to change the direction of the gradient. Now press zero key to bring up render to texture and render out a diffuse into map channel 2.
 I have photoshopped the 'basic uv map' to show what you essentially get at the end. If its more complicated you'll get something like the example shown in bottom right. Now you can use this layer in Photoshop as a mask for dirt/grime/rust/moss. In max you can add noise by playing with the settings to make the gradient less perfect but you can also do that in Photoshop in various ways.
This is a useful trick for complicated environment meshes. I will use a box for this example to make it as straight forward as possible. First of all you need UV channel 1 to be mapped as usual and also need to have channel 2 unwrapped where no polygon is overlapping and has its own space (really cheap and nasty way to do it is to 'unpack uv's' in unwrap editor in Max). Add new material to your mesh (everything you want this effect on should be atatched as one mesh) Add a gradient map into the diffuse slot, feel free to play around with the settings to get the effect you want. Add a UV map, align it correctly and rotate the gizmo if needed in order to change the direction of the gradient. Now press zero key to bring up render to texture and render out a diffuse into map channel 2.
 I have photoshopped the 'basic uv map' to show what you essentially get at the end. If its more complicated you'll get something like the example shown in bottom right. Now you can use this layer in Photoshop as a mask for dirt/grime/rust/moss. In max you can add noise by playing with the settings to make the gradient less perfect but you can also do that in Photoshop in various ways.
Sunday, 27 January 2008
Education : no20 'Turning an difficult photo into seamless texture'
Neil Blevins provides 2 methods on how to fix this common problem after offsetting as shown in the image below
http://www.neilblevins.com/cg_education/brightness_var_tileable_texture/brightness_var_tileable_texture.htm

Neil Blevins provides 2 methods on how to fix this common problem after offsetting as shown in the image below
http://www.neilblevins.com/cg_education/brightness_var_tileable_texture/brightness_var_tileable_texture.htm

Sunday, 20 January 2008
Education : no18 'Creating painted wood'
Really nice and simple tutorial here on achieving an weathered paint effect on wood from Methodonline.
http://www.methodonline.com/painted_tutorial.htm

Really nice and simple tutorial here on achieving an weathered paint effect on wood from Methodonline.
http://www.methodonline.com/painted_tutorial.htm

Friday, 18 January 2008
Education : no17 'masking in'
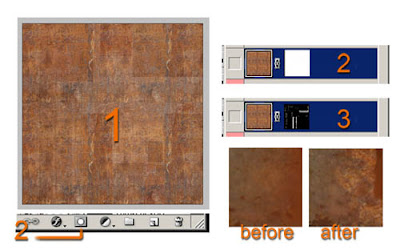
With many textures you need to add general dirt, rust, moss, chipped wood etc. Quick example here of how I go about these.
1. Fill you map with your texture. So here I have just stuck in a photo of rust and healed/cloned it around so that it fills the map. If you're only generally bringing this texture into areas then you can get away with this layer looking tiled other wise just spend a bit more time making sure no obvious shapes repeat etc.
2. Click on Mask. The mask shows as 100% white, make sure to click on the white square in the layers window. Invert (Ctrl & I) to make it black and your rust will vanish.
3. Now you can go into specific areas and with a soft white brush gradually bring it back in.
Doing it this way gives much more control.
With many textures you need to add general dirt, rust, moss, chipped wood etc. Quick example here of how I go about these.
1. Fill you map with your texture. So here I have just stuck in a photo of rust and healed/cloned it around so that it fills the map. If you're only generally bringing this texture into areas then you can get away with this layer looking tiled other wise just spend a bit more time making sure no obvious shapes repeat etc.
2. Click on Mask. The mask shows as 100% white, make sure to click on the white square in the layers window. Invert (Ctrl & I) to make it black and your rust will vanish.
3. Now you can go into specific areas and with a soft white brush gradually bring it back in.
Doing it this way gives much more control.

Tuesday, 25 September 2007
Education : no16 'AO / Lightmap'
1. Throw in skylight, plop.
2. Press '9', turn on light tracer.
3. Select Low poly and press zero key for the render to texture dialogue
4. 'Pick' High poly object
5. Make sure your low and high poly 'fit' each other well. If not then enable projection cage, reset and scrub the 'push' so that you push the cage slightly past the low poly.
6. 'Add' lighting map, setup your filename and location etc
7. Hit render
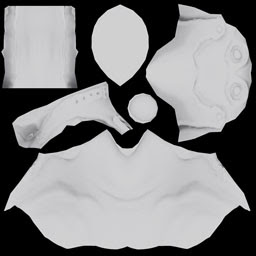
You will get a map similar to the one below. Blend it into your texture psd. (see what blend mode works best for you)
Its vital to do this with all texture passes nowadays, if not your stuff will look dated. Unless you spend ages painting all this detail in, correctly.
1. Throw in skylight, plop.
2. Press '9', turn on light tracer.
3. Select Low poly and press zero key for the render to texture dialogue
4. 'Pick' High poly object
5. Make sure your low and high poly 'fit' each other well. If not then enable projection cage, reset and scrub the 'push' so that you push the cage slightly past the low poly.
6. 'Add' lighting map, setup your filename and location etc
7. Hit render
You will get a map similar to the one below. Blend it into your texture psd. (see what blend mode works best for you)
Its vital to do this with all texture passes nowadays, if not your stuff will look dated. Unless you spend ages painting all this detail in, correctly.


Monday, 17 September 2007

Sunday, 16 September 2007
Education : no 14 'Extra detail in spec maps'
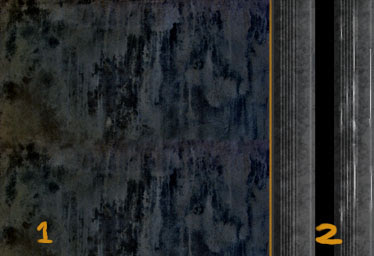
1) Don't just turn the diffuse into a spec map and be done with it. In many cases adding an extra spec grunge/dirt map like this within your spec map only can really create much more interesting and realistic textures.
2) On the left is a simple diffuse to spec conversion but even with the edges, add 'unique to spec only' brightness to it as seen on the right.
1) Don't just turn the diffuse into a spec map and be done with it. In many cases adding an extra spec grunge/dirt map like this within your spec map only can really create much more interesting and realistic textures.
2) On the left is a simple diffuse to spec conversion but even with the edges, add 'unique to spec only' brightness to it as seen on the right.

Tuesday, 11 September 2007

Flashback : no2 'Gears of War texture part 4'
Final part then. Check it area number 4. Again that scratched away surface could be more defined but I won't bring up texture definition again. No the problem I have with this is how its just on ONE of multiple ridges. It all goes back to education no3 where I mentioned storytelling in texture work. If you think about it what I did in this texture meant that when this trunk was being moved about only that particular ridge was getting hit against surfaces. Which of course is just stupid beyond words. The truth is those ridges will be generally getting hit almost equally with there being slightly more damage to the ridges nearer to the corners. Anyway for my fix I only spent a minute but it still shows how if I were to do this again I would tone down the rubbed off/scratched/effected areas on the ridge and apply the same kind of detail to all ridges.


Thursday, 6 September 2007

Friday, 24 August 2007
Education : No12 'Redefining Cartoony game art'
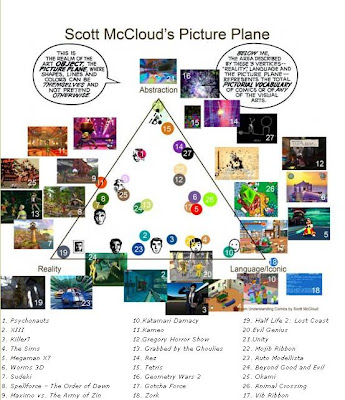
Here is an short article written by a good friend of mine that I had the pleasure of meeting during my university days. The article explores the many different types of cartoon texturing in the gaming scene.
http://www.gamasutra.com/features/20060417/sondergaard_01.shtml
Here is an short article written by a good friend of mine that I had the pleasure of meeting during my university days. The article explores the many different types of cartoon texturing in the gaming scene.
http://www.gamasutra.com/features/20060417/sondergaard_01.shtml


Tuesday, 21 August 2007
Education : no10 'Shadow/Highlight Adjustment tool'
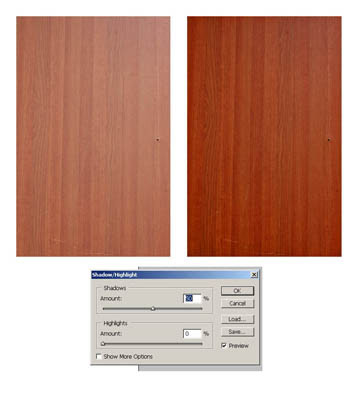
Sometimes texture photo sources have light coming from one direction (image on left). One method to balance out the light source is to use image>adjustment>shadow/highlights (as seen in the image on the right). Then you can adjust levels/saturation etc to bring back the original colour. Not always a perfect solution (the perfect solution involves messing around with the gradient tool) but one which can produce good methods in under a minute.
Sometimes texture photo sources have light coming from one direction (image on left). One method to balance out the light source is to use image>adjustment>shadow/highlights (as seen in the image on the right). Then you can adjust levels/saturation etc to bring back the original colour. Not always a perfect solution (the perfect solution involves messing around with the gradient tool) but one which can produce good methods in under a minute.


Monday, 20 August 2007
Education : no9 'creating edgework in under a minute'
This handy trick from 'mr kite' on cgchat shows how to create simple edges. It involves making a 'cavity' layer that you eventually set to 'soft light' blending mode over your diffuse. It creates simple clean edgework everywhere based on your normal map. Obviously you should n't leave your edgework like this in most cases it will look too clean but it's a great place to start.


Additionally, you may want to clean it up by picking out the dark colours and using the replace colour tool to make them 50% grey like most of the map. Remember, you only want the highlight info here.
This handy trick from 'mr kite' on cgchat shows how to create simple edges. It involves making a 'cavity' layer that you eventually set to 'soft light' blending m


Tuesday, 14 August 2007
Education : no7 'Heal tool'
Never even used about this brush until I got into the industry which is odd since it plays such a big part in my texturing process these days.

Hold down on this button to reveal other options, select 'healing brush tool'. Anyway here is an example of its powers. Below I have used the clone stamp to add some of the left texture to the right. Then in the next example I use the healing tool, notice how it calculates the colours it needs to shift to to blend into the new image?


Never even used about this brush until I got into the industry which is odd since it plays such a big part in my texturing process these days.

Hold down on this button to reveal other options, select 'healing brush tool'. Anyway here is an example of its powers. Below I have use


Subscribe to:
Posts (Atom)